Grab Deal : Flat 30% off on live classes + 2 free self-paced courses! - SCHEDULE CALL

How to Use the Table Designer in an Offline Database Project: Question and Answer

Q.1. How to Use The Table Designer in an Offline Database Project?

Ans: To use the Table Designer in an Offline Database Project, follow these steps:

  • Open the project in Visual Studio, and make sure you have created an Offline Database Project.
  • Use a spreadsheet or any existing data as a reference for the new table you want to create.
  • In the Solution Explorer, navigate to the Tables folder under the dbo schema folder.
  • Right-click the Tables folder and choose Add | Table from the context menu.
  • Name the table (e.g., CustomerRanking) and click Add.
  • Now, the Table Designer window will open, which looks similar to the one used for online work. However, in this case, the designer is working with a model supported by a source-controlled project file (CustomerRanking.sql) instead of a live table.
  • Since this is an offline project, there won't be an Update button as there is no connected database. Any schema changes you make will be saved to the project script file (CustomerRanking.sql).
  • Proceed to design your table, and once you are done, save your changes. The model will be updated accordingly.
  • The offline Table Designer also provides validation checks and IntelliSense, just like when working with an online database.
  • Before deploying the changes to an actual database, you can review and ensure there are no breaking changes.

Remember, an SQL Certification Course can provide you with more in-depth knowledge on using the Table Designer and other SQL topics.

Q.2. How to Create a Table Using Table Designer in Offline Database Projects?

Ans: To create a table using the Table Designer in an Offline Database Project, follow these steps:

  • Open the Offline Database Project in Visual Studio.
  • In Solution Explorer, navigate to the folder where you want to add the new table (e.g., dbo schema folder).
  • Right-click the folder and select Add | Table from the context menu.
  • Give the table a name (e.g., CustomerRanking) and click Add.
  • The Table Designer window will open, showing a new table with a single column named "Id" of data type "int" and set as the primary key.
  • To rename the column to "CustomerRankingId," click on the column name "Id" in the top pane, replace it with "CustomerRankingId," and press Enter.
  • Add a new column called "RankName" below the "CustomerRankingId" column. Change its data type to "varchar(20)" and uncheck "Allow Nulls."
  • You'll notice that SSDT updates the T-SQL code in the bottom window with a CREATE TABLE statement reflecting the changes made in the top pane.
  • If you want to add more columns, you can do so by manually editing the T-SQL code in the bottom pane.
  • Once you finish designing the table, save your changes and close the Table Designer.
  • The new table, "CustomerRanking," has now been created in the Offline Database Project.
  • If you want to add foreign key constraints or more complex relationships, you can use the Table Designer to do so as well.

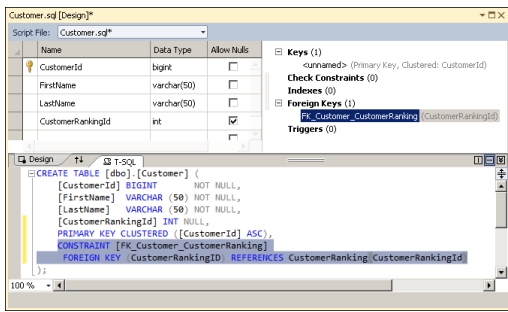
Image:- The Table Designer For The Customer Table After Building The Foreign Key on Customer Ranking Id.

Q.3. How to Remove a Column from a Table Using Table Designer (Connected)?

Ans: To remove a column from a table using the Table Designer in a Connected Database Project, follow these steps:

  • Open the Connected Database Project in Visual Studio.
  • In Solution Explorer, navigate to the table you want to modify (e.g., dbo.Customer).
  • Double-click on the table to open the Table Designer.
  • In the Table Designer window, find the column you want to remove (e.g., CustomerRanking) in the top pane's grid.
  • Right-click on the column name and choose "Delete" from the context menu. The column will be removed from the top pane.
  • SSDT will automatically update the T-SQL code in the bottom pane to reflect the changes made in the top pane.
  • Click the "Update" button in the toolbar to apply the changes to the connected database.
  • However, if there are any dependencies on the column you're trying to remove (e.g., in views or constraints), SSDT will display an error message, and the update won't proceed until you resolve these dependencies.
Update cannot proceed due to validation errors.
Please correct the following errors and try again.
SQL71501 :: View: [dbo].[vwCustomerOrder Summary] contains an unresolved reference to an object. Either the object does not exist or the reference is ambiguous because it could refer to any of the following objects: [dbo].[Customer].[c]:: [CustomerRanking], [dbo].[Customer]. [CustomerRanking] or [dbo].[OrderHeader]. [c] :: [CustomerRanking].
SQL71501 :: View: [dbo].[vwCustomerOrder Summary] contains an unresolved reference to an object. Either the object does not exist or the reference is ambiguous because it could refer to any of the following objects: [dbo].[Customer].[c]:: [CustomerRanking], [dbo].[Customer]. [CustomerRanking] or [dbo].[OrderHeader]. [c] :: [Customer Ranking].
SQL71558 The object reference [dbo].[Customer]. [CustomerID] differs only by case from the object definition [dbo].[Customer]. [CustomerId].
SQL71558 The object reference [dbo].[OrderHeader]. [CustomerID] differs only by case from the object definition [dbo].[OrderHeader]. [CustomerId].

Code:- Error Message

  • To fix the error, you may need to modify or delete the dependent objects (views, constraints) before removing the column.
  • Once the error is resolved, click "Update" again to successfully remove the column from the table.
  • After the successful update, the column will be removed from the connected database.

Remember to be cautious when removing columns, as they may be referenced in other parts of the database schema, leading to potential data inconsistencies. Always review the dependencies before making such changes.

Q.4. Write The Changed Script for The Updated Table and View Automatically Created by SSDT in The Above Example?

Ans: The changed script for the updated table and view automatically created by SSDT would look like this:

ALTER TABLE dbo.Customer
DROP COLUMN CustomerRanking
GO

-- Change script for the updated view (dbo.vwCustomerOrderSummary)
USE SampleDb
GO

-- Drop the existing view
IF OBJECT_ID('dbo.vwCustomerOrderSummary', 'V') IS NOT NULL
DROP VIEW dbo.vwCustomerOrderSummary
GO

-- Create the new view with updated schema
CREATE VIEW dbo.vwCustomerOrderSummary AS
SELECT
    c.CustomerID,
    c.FirstName,
    c.LastName,
    c.CustomerRanking,
    ISNULL(SUM(oh.OrderTotal), 0) AS OrderTotal
FROM
    dbo.Customer AS c
LEFT OUTER JOIN dbo.OrderHeader AS oh ON c.CustomerID = oh.CustomerID
GROUP BY
    c.CustomerID,
    c.FirstName,
    c.LastName,
    c.CustomerRanking
GO

This script first drops the "CustomerRanking" column from the "dbo.Customer" table and then drops the existing view "dbo.vwCustomerOrderSummary." Finally, it recreates the view with the updated schema.

Q.5. What Does The Changed Script of The Altered Table and View Generated by SSDT Do?

Ans: The changed script for the altered table and view generated by SSDT does the following:

  • It drops the "CustomerRanking" column from the "dbo.Customer" table. This action permanently removes the column and its associated data from the table.
  • It drops the existing view "dbo.vwCustomerOrderSummary." Dropping the view deletes its definition, and the view is no longer available in the database.
  • It recreates the view "dbo.vwCustomerOrderSummary" with the updated schema. The view is based on the "dbo.Customer" and "dbo.OrderHeader" tables, and it calculates the total order amount for each customer.
  • The entire change script is executed within a transaction to ensure the changes are committed only if all the steps are successful.

In summary, the script ensures that the "CustomerRanking" column is removed from the "dbo.Customer" table, and the view "dbo.vwCustomerOrderSummary" is updated to reflect this change and continue providing the required summary of customer orders.

Q.6. How to Run a Query To View Data?

Ans: To run a query and view data in SSDT, follow these steps:

  • Open the desired project in Visual Studio.
  • In Solution Explorer, locate and double-click the "dbo.Customer.sql" file (or any other SQL file) to open a query window.
  • In the query window, type the SELECT statement to retrieve the data you want to view. For example:

SELECT * FROM dbo.Customer;

  • To execute the query, press Ctrl+Shift+E or click the "Execute" button in the toolbar. The query will be executed against the connected database.
  • The results of the query will be displayed in the "Results" pane at the bottom of the query window, showing the data retrieved from the "dbo.Customer" table.
  • You can also run multiple queries in the same query window. Just select the specific queries you want to execute and then press Ctrl+Shift+E or click "Execute" to see the results.
  • To view data from a different table or view, modify the SELECT statement in the query window accordingly, and re-run the query.
  • After viewing the results, you can close the query window or keep it open to perform additional queries.

Remember to use SELECT statements responsibly, especially when dealing with large datasets, as retrieving too much data can impact the performance of the database.

/*
Deployment script for SampleDb
*/
// ...
:setvar DatabaseName "SampleDb"
GO
//
USE [$(DatabaseName)];
GO
// ...
BEGIN TRANSACTION
GO
PRINT N'Removing schema binding from [dbo].[vwCustomerOrderSummary]...'; GO
ALTER VIEW [dbo].[vwCustomerOrderSummary]
AS
SELECT
c. CustomerID,
c. FirstName,
FROM
c. LastName,
c.CustomerRanking,
ISNULL(SUM(oh.OrderTotal), 0) AS OrderTotal
dbo.Customer AS C
LEFT OUTER JOIN
dbo.OrderHeader AS oh
ON c.CustomerID = oh. CustomerID
GROUP BY c.CustomerID, c.FirstName, c.LastName, c.CustomerRanking; // ...
GO
PRINT N'Altering [dbo].[Customer]...';
GO
ALTER TABLE [dbo].[Customer] DROP COLUMN [CustomerRanking];
GO
// ...
PRINT N'Adding schema binding to [dbo].[vwCustomerOrderSummary]...';
GO
--
Create a handy view summarizing customer orders
ALTER VIEW vwCustomerOrderSummary WITH SCHEMABINDING AS
SELECT
c. CustomerID, c.FirstName, c.LastName,
ISNULL(SUM(oh.OrderTotal), 0) AS OrderTotal
FROM
dbo.Customer AS c
LEFT OUTER JOIN dbo.OrderHeader AS oh ON c.CustomerID = oh. CustomerID GROUP BY
c. CustomerID, c. FirstName, c.LastName

Image:- Viewing The Results of Selected Statements Performed in The Query Window

Close the query window. Refresh can be selected by right-clicking the Databases node in SQL Server Object Explorer. The new SampleDb database node will now be visible. To drill down into the database, expand it.depicts this.

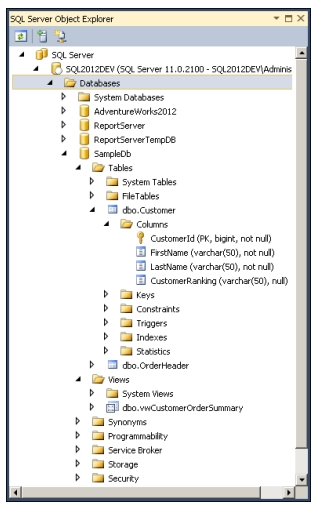
Image:- The SampleDb database in SQL Server Object Explorer is Enlarged to Show Several of Its Objects

Q.7. How to Connect with SQL Server Object Explorer?

Ans. To establish a connection with SQL Server Object Explorer, you need to follow these steps. This guide will walk you through the process of creating a connection, constructing a database, and executing queries using SQL Server Object Explorer in Visual Studio.

Step 1: Launch Visual Studio and Access SQL Server Object Explorer

  • Open Visual Studio 2010.
  • From the View menu, select "SQL Server Object Explorer" and click OK. This action will display the SQL Server Object Explorer panel within Visual Studio.

Step 2: Connect to a Server Instance

  • Right-click the SQL Server node at the top of the SQL Server Object Explorer panel.
  • Choose "Add SQL Server" from the context menu.
  • Enter your computer's name as the server to connect to.

Step 3: Provide Authentication Credentials

  • If you're using SQL Server authentication and not Windows authentication, you need to provide your credentials at this point.
  • Select "SQL Server Authentication" and enter your credentials if your SQL Server setup uses mixed-mode authentication.

Step 4: Explore the Connected Server

  • Once connected, the SQL Server Object Explorer will display the production server, allowing you to navigate through its hosted databases.

Step 5: Open a New Query Window

  • Right-click the server instance node named after your machine.
  • Select "New Query" to open a T-SQL code editor window.

Step 6: Choose the Default Database

  • From the drop-down list on the toolbar, select the default database you wish to work with.
  • For creating a new database, you can set the current database to "master."

Step 7: Execute the T-SQL Script

  • Your query window will contain the T-SQL code.
  • To execute the script, press Ctrl+Shift+E or click the "Execute Query" button in the toolbar.
  • The script will create the database. The results will be displayed in the bottom pane, showing server messages and execution status.

Step 8: Review the Results

  • After successful execution, you'll see a "Query Executed Successfully" indicator in the bottom-left corner.
  • Review the messages in the Message pane to confirm the script's impact on the database.

Step 9: Understand the Script

  • The provided T-SQL script creates a database named "SampleDb."
  • It constructs tables "Customer" and "OrderHeader," establishes a foreign key relationship, and inserts sample data.
  • A view named "vwCustomerOrderSummary" is created to summarize customer orders.

By following these steps, you can effectively connect with SQL Server Object Explorer through Visual Studio. This provides you with the ability to interact with databases, execute queries, and manage database objects effortlessly.

Q.8. How to Protect Yourself From Accidentally Changing The Master Database When Working With SSDT?

Ans. To safeguard yourself from inadvertently making changes to the master database while working with SSDT (SQL Server Data Tools), consider following these steps:

  • Change Default Database: By default, every login's default database is set to the master database. However, you can adjust this setting to ensure that your application's database is the default instead. This helps mitigate the risk of accidentally altering or corrupting the master database.
  • Prevent Accidental Changes: Switching your default database to your application's database means that any new query windows you open in SSDT will automatically connect to your application's database instead of the master database. This significantly reduces the chance of unintentional data modifications in the master database.
  • Accessing Default Database Setting: To view your login's default database setting, access the Properties window. You can find this window by navigating to the Security node in SQL Server Object Explorer.
  • Limitation of SSDT Tooling: Note that while you can execute an ALTER LOGIN statement through a query window in SSDT to change the default database setting, this specific management operation might not be supported by the SSDT tooling itself.
  • Using SSMS for Changes: As an alternative, you can achieve this goal using SQL Server Management Studio (SSMS). Here's how:
  1. Launch SSMS and establish a connection to your SQL Server instance.
  2. Using the SSMS Object Explorer, navigate to your login under the Security and Logins nodes.
  3. Right-click the login and select Properties.
  4. In the Properties window, locate the default database drop-down list.
  5. Instead of "master," select the database associated with your application.
  6. Save the changes by clicking OK.
  • Future Impact: Once you've changed the default database setting, every new query window you open in SSDT will automatically connect to your application's database rather than the master database.

By making these adjustments, you're proactively reducing the risk of accidental changes or corruption in the master database while working with SSDT. This practice contributes to a more controlled and secure development environment for your SQL Server projects.

Conclusion

Mastering the usage of Table Designer in both offline and connected modes is a pivotal skill for efficiently managing database schema changes and ensuring data integrity. The provided instructions guide you through creating, modifying, and viewing tables, as well as safeguarding against unintended changes to critical databases. By following these step-by-step procedures, you can confidently navigate through SQL Server Data Tools (SSDT) and SQL Server Object Explorer within Visual Studio, empowering you to streamline database development, enhance your data management practices, and create robust and reliable applications. Remember that continuous learning, such as pursuing an SQL Certification Course, can further deepen your understanding of these tools and techniques, enabling you to harness their full potential for successful database design and maintenance.

Trending Courses

Cyber Security

  • Introduction to cybersecurity
  • Cryptography and Secure Communication 
  • Cloud Computing Architectural Framework
  • Security Architectures and Models

Upcoming Class

0 day 26 Jul 2024

QA

  • Introduction and Software Testing
  • Software Test Life Cycle
  • Automation Testing and API Testing
  • Selenium framework development using Testing

Upcoming Class

11 days 06 Aug 2024

Salesforce

  • Salesforce Configuration Introduction
  • Security & Automation Process
  • Sales & Service Cloud
  • Apex Programming, SOQL & SOSL

Upcoming Class

-1 day 25 Jul 2024

Business Analyst

  • BA & Stakeholders Overview
  • BPMN, Requirement Elicitation
  • BA Tools & Design Documents
  • Enterprise Analysis, Agile & Scrum

Upcoming Class

0 day 26 Jul 2024

MS SQL Server

  • Introduction & Database Query
  • Programming, Indexes & System Functions
  • SSIS Package Development Procedures
  • SSRS Report Design

Upcoming Class

0 day 26 Jul 2024

Data Science

  • Data Science Introduction
  • Hadoop and Spark Overview
  • Python & Intro to R Programming
  • Machine Learning

Upcoming Class

0 day 26 Jul 2024

DevOps

  • Intro to DevOps
  • GIT and Maven
  • Jenkins & Ansible
  • Docker and Cloud Computing

Upcoming Class

1 day 27 Jul 2024

Hadoop

  • Architecture, HDFS & MapReduce
  • Unix Shell & Apache Pig Installation
  • HIVE Installation & User-Defined Functions
  • SQOOP & Hbase Installation

Upcoming Class

7 days 02 Aug 2024

Python

  • Features of Python
  • Python Editors and IDEs
  • Data types and Variables
  • Python File Operation

Upcoming Class

0 day 26 Jul 2024

Artificial Intelligence

  • Components of AI
  • Categories of Machine Learning
  • Recurrent Neural Networks
  • Recurrent Neural Networks

Upcoming Class

15 days 10 Aug 2024

Machine Learning

  • Introduction to Machine Learning & Python
  • Machine Learning: Supervised Learning
  • Machine Learning: Unsupervised Learning

Upcoming Class

28 days 23 Aug 2024

Tableau

  • Introduction to Tableau Desktop
  • Data Transformation Methods
  • Configuring tableau server
  • Integration with R & Hadoop

Upcoming Class

7 days 02 Aug 2024