Q.1. List The Steps to Rename a Table and Columns?
Ans: To rename a table and columns in the CustomerRanking database, follow these steps:
1. Table Rename:
- Right-click on the CustomerRanking table reference in the newly added LEFT OUTER JOIN.
- Select "Refactor" and then "Rename".
- Enter "Ranking" as the new table name and click "OK".
- A preview window will appear, showing the changes that will be applied to the database.
2. Column Rename:
- Let's take the example of renaming the "CustomerRankingId" column.
- Right-click on the "r.CustomerRankingId" key column in the JOIN statement.
- Choose "Refactor" and then "Rename".
- Enter "RankingId" as the new name for the primary key column in the Ranking table and click "OK".
- Repeat the process for the foreign key column "c.CustomerRankingId" in the Customer table, and enter the new name as desired.
3. Update Foreign Key:
- Right-click on the view's FROM clause and choose "Go to Definition".
- This will open a new query window and navigate to the Customer table definition.
- Right-click on the "FK Customer CustomerRanking" in the CONSTRAINT clause.
- Select "Refactor" and then "Rename".
- Enter "FK Customer Ranking" as the new name and click "OK" to apply the changes.
4. Apply Changes:
- Click "Apply" to update all the references to the CustomerRanking table with the new name "Ranking".
- After applying the changes, check that the project files are appropriately updated with the new names.
5. Rename Project Script File:
- Rename the project script file from "CustomerRanking.sql" to "Ranking.sql" by selecting "Rename" from the context menu in Solution Explorer.
6. Verify Changes:
- Press F5 to build the project and verify that the CustomerRanking table has been renamed to "Ranking" in the SQL Server Object Explorer toolbar.
- To ensure that all the data in the renamed table is present, right-click the "Ranking" table and select "View Data".
Q.2. How to Create a Stored Procedure That Ranks Data?
Ans. To create a stored procedure that ranks the customers based on their total order amount, follow these steps:
Create a Stored Procedures Folder:
- In Solution Explorer, right-click the "dbo" folder and select "Add | New Folder".
- Name the new folder "Stored Procedures".
Add a New Stored Procedure:
- Right-click the newly created "Stored Procedures" folder and select "Add | Stored Procedure".
- Name the stored procedure as "uspRankCustomers" and click "Add". A new T-SQL editor window will open with the script.
Write the Stored Procedure:
- Replace the template code in the "uspRankCustomers.sql" window with the code to rank customers based on their total order amount.
- Save the changes to the stored procedure.
Build the Project:
- Press F5 to build the project and ensure there are no errors.
Deploy the Stored Procedure:
- Press Ctrl+Shift+E to deploy the stored procedure to the LocalDB's test database.
Verify the Results:
- To see the results of the stored procedure, execute "EXEC uspRankCustomers" in the query window.
- The customers should now have ranks assigned based on their total order amounts.
Please note that this example demonstrates a basic ranking procedure. You can customize the stored procedure based on your specific ranking criteria.
WHILE @@FETCH_STATUS = 0
BEGIN
END
IF @OrderTotal = 0 SET @RankingId - 1
ELSE IF @OrderTotal
ELSE IF @OrderTotal
ELSE IF @Order Total
100 SET @RankingId = 2 1000 SET @RankingId = 3 10000 SET @RankingId = 4
ELSE SET @RankingId = 5
UPDATE Customer
SET RankingId = @RankingId
WHERE CustomerId = @CustomerId
FETCH NEXT FROM curCustomer INTO @CustomerId, @OrderTotal
CLOSE curCustomer
DEALLOCATE curCustomer
Listing:- The stored procedure for ranking customers based on their total order amount.
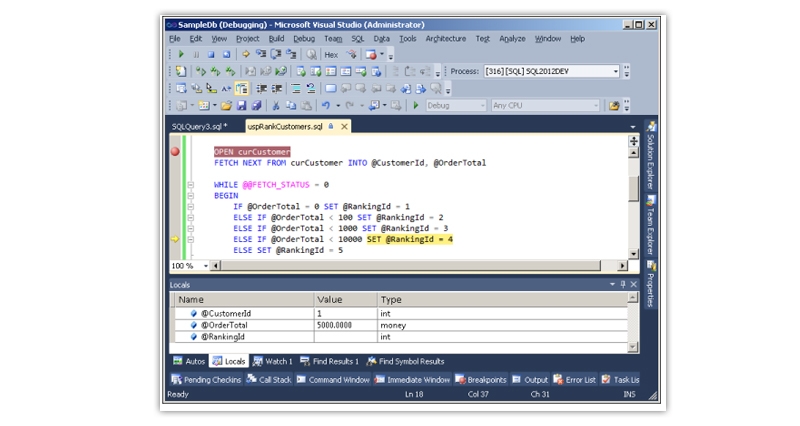
Q.3. Explain How To Use The Integrated Debugger In Visual Studio With An Example?
Ans: To use the integrated debugger in Visual Studio with the "uspRankCustomers" stored procedure, follow these steps:
Set a Breakpoint:
- Open the "uspRankCustomers.sql" window.
- Click inside the left margin of the "OPEN curCustomer" line to set a breakpoint (a red bullet will appear).
Start Debugging:
- Right-click the stored procedure code and select "Debug Procedure" to call the "uspRankCustomers" stored procedure.
- The debugger will launch, and execution will pause at the "USE [SampleDb]" statement.
Single Step through Execution:
- Press F5 to continue execution and reach the breakpoint you set earlier.
- Use the F10 key to single step through the execution of the stored procedure.
- The Locals window will show the values of variables like "@OrderTotal" and "@CustomerId" during execution.
Modify Variable Values:
- In the Locals window, you can double-click the "@OrderTotal" value and modify it to simulate different order amounts.
- Continue single-stepping through the execution to see how the stored procedure assigns ranks based on the modified value.
Verify Results:
- After the execution is complete, check the "vwCustomerOrderSummary" view to see the updated rankings.
Stop Debugging:
- Press F5 to stop debugging and complete the execution.
The integrated debugger in Visual Studio allows you to step through the code and inspect variables to understand how the stored procedure works and identify any issues.

Image:- T-SQL debugging session of Visual Studio's stored procedure.
Q.4. What Is Schema Compare? How Can You Compare Schemas?
Ans: To compare schemas using SSDT, follow these steps:
Open Schema Compare Window:
- Right-click the "SampleDb" project in Solution Explorer and select "Schema Compare".
- The "Schema Compare" window will open, and it will automatically set the source to the project and ask for the target.
Select Target Schema:
- Choose the target schema, which can be a database, project, or snapshot.
- In this case, select the active "SampleDb" database running on "SQL2012DEV" as the target.
- Click "OK" to initiate the schema comparison process.
Review Schema Differences:
- The schema compare tool will show all the differences between the project and the live database on "SQL2012DEV".
- You can see differences in tables, views, stored procedures, and other database objects.
Generate Change Script:
- To update the live database, you can choose to immediately apply the change script without previewing it.
- Alternatively, you can generate the change script, review it, and then decide whether to apply it.
Apply Changes (Optional):
- If you are confident in the changes, press the "Update" button in the toolbar to apply the changes to the target database.
- Confirm any warnings or prompts that appear during the update process.
Verify Results:
- After the update, refresh the "SampleDb" under "SQL2012DEV" in SQL Server Object Explorer to see the updated schema.
SSDT's schema compare functionality helps you identify and synchronize differences between the project and the target database, making it easier to maintain consistency and deploy schema changes.
Q.5. How To Import Reference Data Into The Live Database With SSDT?
Ans: To import reference data into the live database with SSDT, follow these steps:
1. Script Reference Data:
- Open SQL Server Object Explorer and locate the "Ranking" table under the "(localdb)\SampleDb" node.
- Right-click on the table and select "View Data".
- Click the "Script" button on the toolbar to generate INSERT statements for the reference data rows.
2. Copy INSERT Statements:
- Select all the generated INSERT statements and copy them to the clipboard.
3. Open New Query Window:
- Right-click the "SampleDb" database under the "SQL2012DEV" node in SQL Server Object Explorer.
- Select "New Query" to open a new query window.
4. Paste and Execute INSERT Statements:
- Paste the copied INSERT statements into the new query window.
- Press Ctrl+Shift+E to execute the INSERT statements and import the reference data into the live database.
5. Update Customers with uspRankCustomers:
- In the same query window, type "EXEC uspRankCustomers" and execute the stored procedure.
- This will update the customers' ranking based on their total order amounts.
6. Verify Results:
- To check the updated rankings, execute "SELECT * FROM vwCustomerOrderSummary" in the query window.
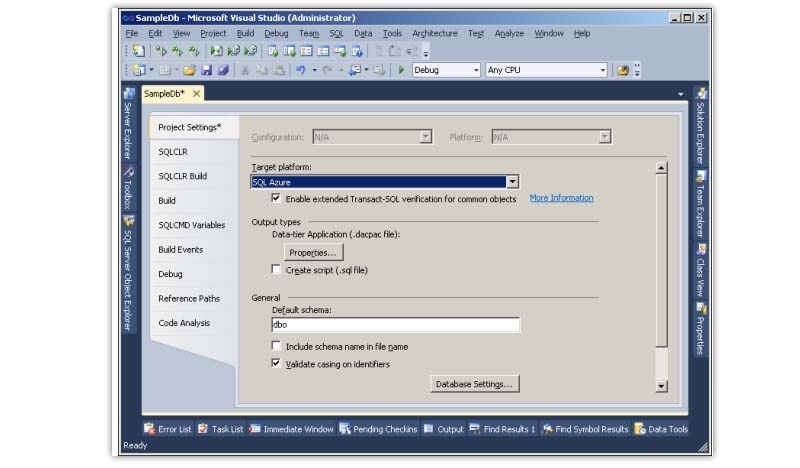
Q.6. How To Deploy SQL Server Database Project To SQL Azure?
Ans: To deploy the SQL Server Database Project to SQL Azure, follow these steps:
1. Change Target Platform:
- In Solution Explorer, right-click the "SampleDb" project and select "Properties".
- In the "Project Settings" tab, change the "Target platform" from "SQL Server 2012" to "SQL Azure".
- Save the changes and close the properties window.
2. Build the Project:
- Press F5 to build the project and ensure there are no errors.
3. Publish the Database:
- Right-click the "SampleDb" project under Solution Explorer and select "Publish".
- In the "Publish Database" dialog, click "Edit" and enter the server and login details for SQL Azure.
- Click "OK" to connect to the SQL Azure database.
4. Deploy to SQL Azure:
- Click "Publish" in the "Publish Database" dialog to initiate the deployment to SQL Azure.
- SSDT will compare the schema of the target SQL Azure instance with the project and generate a change script.
- The change script will be applied to create the entire database in the cloud.
5. Verify Deployment:
- After the deployment is complete, the SQL Azure database will be joined to the SQL Server Object Explorer.
- To check the database's presence and the successful deployment, expand the SQL Azure server instance.
Image:- Changing the target platform from SQL Server Database Project to SQL Azure.
Q.7. State the Drawbacks of SSDT?
Ans: Although SSDT offers many benefits, it also has some drawbacks:
- Limited Data-Oriented Functionality: SSDT lacks data-oriented functionality such as generating data, data comparison, and supporting database unit testing. This functionality is available in Visual Studio Database Professional edition (DbPro), but not in SSDT.
- Lack of Spatial Viewer: SSDT does not include a spatial viewer like the one available in SQL Server Management Studio (SSMS), which allows graphical display of spatial data and spatial queries.
- Limited Support for Certain Advanced Features: Some advanced features and database-specific functionalities might not be fully supported or may require manual intervention when using SSDT.
- Limited Tooling for Non-Relational Databases: SSDT primarily focuses on relational databases and might not provide extensive tooling support for non-relational databases like NoSQL databases.
- Difficulty with Database Diagrams: SSDT lacks support for database diagrams, which can be useful for visualizing and designing database structures.
Despite these drawbacks, SSDT remains a powerful tool for database development and deployment, especially for SQL Server databases.
Q.8. How to Retire The Ad-hoc Data Entry Columns and Replace Them With a Formalized Customer Ranking System?
Ans: To retire the ad-hoc data entry columns and implement a formalized customer ranking system, follow these steps:
Delete Ad-hoc Data Entry Columns:
- Remove the "CustomerRanking" column from the "Customer" table, as it was used for ad-hoc data entry.
Create New CustomerRanking Table:
- Create a new table named "CustomerRanking" based on the provided spreadsheet data.
- Include a primary key column "CustomerRankingId" with values from 1 to 5, representing different ranking levels.
Add CustomerRankingId Column:
- Add a new column "CustomerRankingId" to the "Customer" table.
- This column will serve as a foreign key referencing the "CustomerRanking" table.
Establish Foreign Key Relationship:
- Form a foreign key relationship between the "CustomerRankingId" column in the "Customer" table and the "CustomerRanking" table.
Update vwCustomerOrderSummary View:
- Modify the "vwCustomerOrderSummary" view to join the "Customer" table with the "CustomerRanking" table using the "CustomerRankingId" column.
Create New uspRankCustomers Stored Procedure:
- Create a new stored procedure "uspRankCustomers" to update the "CustomerRankingId" column in the "Customer" table based on the total order amount.
Verify SQL Azure Compatibility:
- Ensure that the changes made are compatible with SQL Azure by checking for any unsupported features.
Deploy to SQL Azure:
- Publish the database to SQL Azure, making the formalized customer ranking system available in the cloud.
Q.9. What is The SSDT Umbrella of Services and Tools?
Ans: The SSDT (SQL Server Data Tools) umbrella includes a range of services and tools for database development and deployment. These services and tools are designed to work with SQL Server and other related technologies. The key components of the SSDT umbrella are:
- Database Projects: SSDT enables you to create database projects in Visual Studio. These projects act as containers for all database schema objects, scripts, and settings. They allow developers to manage database schema and version control effectively.
- Schema Compare: The Schema Compare tool helps compare the schema of two databases or a database project against a live database. It identifies the differences and generates a change script to synchronize the database schema.
- Data Compare: The Data Compare tool enables comparing data between two databases or a database project and a live database. It highlights data discrepancies and allows developers to synchronize data between databases.
- Query Designer: The Query Designer provides a graphical interface for building and editing database queries. It helps developers design complex SQL queries with ease.
- SQL Server Object Explorer: This tool provides a hierarchical view of connected SQL Server instances, databases, and objects. Developers can browse, manage, and interact with database objects using SQL Server Object Explorer.
- Integrated Debugger: SSDT includes an integrated debugger that allows developers to debug T-SQL code in stored procedures, functions, and triggers. It helps identify and resolve code-related issues efficiently.
- Publish Database: The Publish Database tool enables deploying database projects to various target databases, including SQL Server instances, SQL Azure, and more. It generates change scripts to apply schema updates to the target database.
- SQL Server Analysis Services (SSAS): SSDT supports developing and deploying SSAS projects, allowing developers to design multidimensional and tabular data models.
- SQL Server Reporting Services (SSRS): SSDT includes tools for creating, editing, and deploying SSRS reports, providing powerful reporting capabilities.
- SQL Server Integration Services (SSIS): SSDT offers support for building, managing, and deploying SSIS packages for data integration and transformation.
Conclusion
In conclusion, this comprehensive guide has illuminated the multifaceted landscape of SQL Server database development and deployment through the lens of SQL Server Data Tools (SSDT). By following the step-by-step instructions and insights provided, you can navigate the intricate journey of crafting and managing databases with efficiency and precision.
From renaming tables and columns to constructing sophisticated stored procedures, SSDT empowers developers to wield their creativity and technical acumen harmoniously.
 Grab Deal : Upto 30% off on live classes + 2 free self-paced courses - SCHEDULE CALL

 Jul 11, 2023
  3.3k
3.3k