
 May 05, 2020
  8.2k
8.2k

18
JunMonth End Offerl : Get 30% OFF + $999 Study Material FREE - SCHEDULE CALL
- DevOps Blogs -
Before going into Jenkins installation, question comes into our mind i.e. What exactly is Jenkins? Why is there even any need for such a tool? So, the answer would be, Jenkins is similar to a CI server, which incorporates continuous integration and delivery of almost all languages and source code repositories. It is free and open source. Jenkins helps in
Most commonly, Jenkins is known as CI/CD server as well. Jenkins is mainly known as “Jenkins for DevOps” as it is a single point to perform all DevOps related activities which makes it a widely used open source tool for Devops automation.
DevOps Training & Certification Course

As time progressed, “Jenkins for DevOps” started being to “Jenkins for QA” and Jenkins for “Developers” too as it handles complete software cycle. Now, let’s come back to the topic i.e.
Jenkins installation can be done for every OS(Operating System) whether Windows or any flavor of Linux(FreeBSD, Gentoo, OpenBSD, openSUSE, Fedora, CentOS, Ubuntu, Debian) or cloud(like Azure) or through Docker containers. List of jenkins download support type is defined here.
As the best practice, always go for LTS(Long Term Support) release. At the time of writing this blog, 2.222.3 is the LTS version.
Here, we will explain two ways which are widely used:
1. As a prerequisite, Jenkins installation requires JAVA to be present on system. We can check whether JAVA is installed or not by executing following command:
opt]# java -version

 bash: java: command not found
2.Java is not in place or installed, so let's install JAVA first to start with our main goal and then need to set the Environment Variable i.e. JAVA_HOME. Execute following command directly from your machine:
yum install java
3. Please note as I am working on Centos 7, so used “yum” for installation. Depending on type of flavors, you can use “apt-get” or “deb” also & for Windows OS, users have to place the “.exe” file and then install. For Linux, “tar.gz” file option is also available to download, instead of package
4. If downloading “tar.gz” or “.exe”/ “.zip”, follow these steps
Go to URL: http://www.oracle.com/technetwork/java/javase/downloads/index.html. Under “Java Platform, Standard Edition”, you will find different JAVA options. Select “Java SE 11.0.{x}”, then click “Download”, accept License Agreement, select required OS and respective package.
DevOps Training & Certification Course

Then that package will be downloaded in your system and then move forward.
So, we just discussed different ways of installing JAVA depending on OS and now for this blog, for Jenkins, we will be using openJDK 1.8 which is present as default package in CentOS machine.
5. Once Java gets installed or unzipped, set JAVA_HOME as Environment variable with /path/where/java/is/located.
6. Check installation by executing
opt]# java -version

 openjdk version "1.8.0_242"

 OpenJDK Runtime Environment (build 1.8.0_242-b08)

 OpenJDK 64-Bit Server VM (build 25.242-b08, mixed mode)
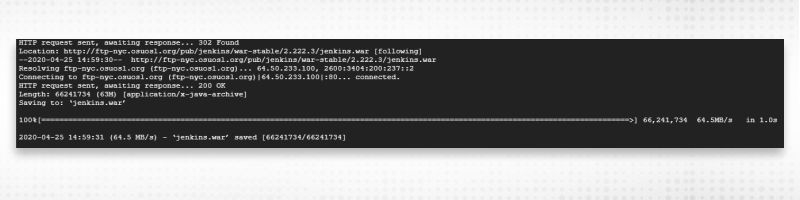
7. Go to the already created directory “/opt”(It’s user choice) or create your own directory at desired location where we will download Jenkins war and perform Jenkins installation from war.
Execute:
sudo wget http://mirrors.jenkins.io/war-stable/latest/jenkins.war
8. Now, Jenkins installation from war can performed by using any of the following methods:
“java” command
Execute:

 java -jar jenkins.war &

 ‘&’ (Ampersand) is to run it as a background process.

 Once executed, you can view the process running by executing

 ps -ef | grep jenkins
Logs will start coming up.
b.by placing the war behind an application server like “Tomcat”.
Download Apache Tomcat(if not already installed) from https://tomcat.apache.org/download-90.cgi
and place “jenkins.war” inside
Note:- It will be straightforward to download/install TOMCAT, I am not explaining it here as it’s out of context. Thanks

Start Tomcat application server. Go to/bin directory and execute: ./startup.sh Check the logs in file “catalina.out” using tail command. tail -f logs/catalina.out
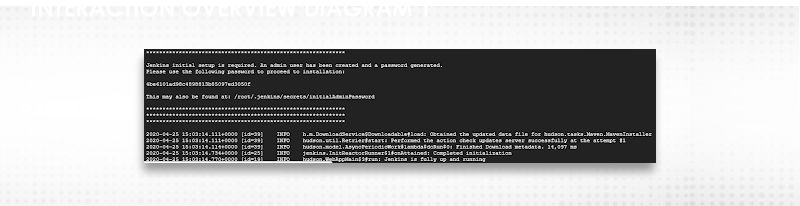
Try any one of the above methods and once you see “Jenkins is fully up and running” in the logs, open the URL in the browser.
http://:8080 (If executed by “java” command)

 http://:8080/jenkins (If executed by “Tomcat” application server)
Note:- There can be a scenario where it will say “Address already in Use”. This issue can occur as the 8080 port might be already in use and can not be used for Jenkins. So, run Jenkins by specifying new “--httpPort” or change “server.xml” file in TOMCAT and define new port
1. Download jenkins.repo from the red hat package and place it in the local “yum” package location. With this, it will download jenkins key also that can be imported using the “rpm” command. (RPM — Red Hat Package Manager) Execute below commands to perform this operation:
sudo wget -O /etc/yum.repos.d/jenkins.repo https://pkg.jenkins.io/redhat/jenkins.repo
sudo rpm --import https://pkg.jenkins.io/redhat/jenkins.io.key
2. There can be a case that your key import will fail, that can be because the key was already imported before and not required again and again. Once key imported successfully, Install Jenkins using “yum” command:
sudo yum install jenkins
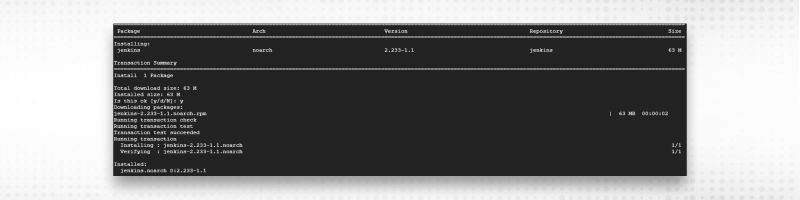
3. Once Jenkins installation is done successfully, open the URL in the browser.
http://:8080
Now, let’s explore Jenkins in below section
Exploring Jenkins
DevOps Training & Certification Course

This will be the first screen(when Jenkins starting first time)

2.Enter “Administrator password” from the mentioned location(as you can see from above screenshot) in the file “initialAdminPassword” and click “Continue”.
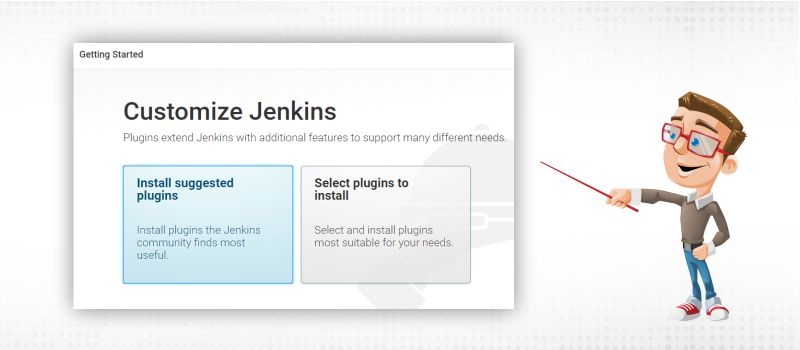
Initially start with selecting “Install Suggested Plugins”


Wait for a few minutes to complete installation of plugins. As you can see, it will install some default plugins like “Ant”, “Gradle”, “Github Branch Source”, “GIT” etc.
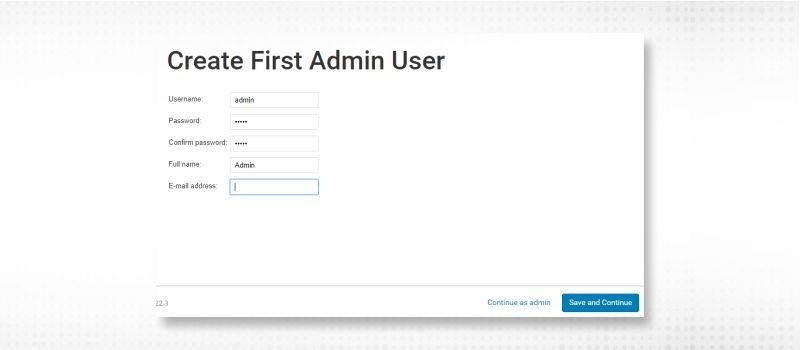
4. Create the first Admin user and “Save and Continue”. Remember this for future logins.
5. Let Jenkins URL field remain the same and then “Save and Finish”.
6. Now, here comes the Jenkins Dashboard. Following will be your actual screen which will be the default page now whenever you open Jenkins. Start using Jenkins.
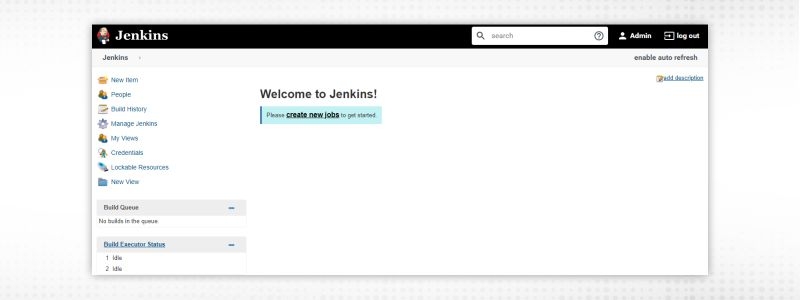
Jenkins dashboard can be beautified in multiple ways. First screen is the actual dashboard which provides an overview of the whole Jenkins. Let’s try to explain Jenkins dashboard by categorizing it into three parts:
Left side

As you can see, the left side of Jenkins dashboard comprises various links. Following will give you a basic idea of each and every link/text.
New Item → Type of Job you want to create

 People → Users
 Build History → History of all builds of Jenkins
 Manage Jenkins → Single point window to administer/manage Jenkins

 My Views → Job(s) view specific to logged-in user

 Credentials → List of all credentials/secrets stored in Jenkins for third party tools

 Lockable Resources → If a build requires a resource which is already locked, it will wait for the resource to be free.

 New View → Used when creating a view for a specific set of jobs.
 Build queue → List all builds pending to start

Build Executor Status → List of builds currently executing
Middle

Middle part of Jenkins dashboard is having a shortcut to “create new jobs”(as this is the first time). Once jobs are created, Jenkins dashboard will consist of job details or any view (set of jobs) created in the future. You will get all the details regarding jobs like “Job Name”, “Last Success”, “Last Failure” and “Last Duration”.
Right

Right side of Jenkins dashboard mainly describes user and Jenkins general info:
Admin → User Name from which you have logged-in
log-out → to log out from the current user. After logging-out, you will see a log-in option but that too depends how you configure Jenkins. Sometimes, you will see only the login page before the dashboard.
enable auto refresh → Jenkins browser will be refreshed automatically. Once this is clicked, you will see “disable auto refresh” option to disable automatic refreshing of page
add description → To add something about Jenkins for the whole team.
This blog will help you in creating a Jenkins instance on various platforms and through awesome multiple ways as different teams/organizations use their own set of tools. We can’t deny the fact that Jenkins can configure almost each third-party tool and integrate easily with all of them.
So, did you try the Jenkins installation at your end? Please let me know if you were able to successfully create the Jenkins instance or ran into several issues. We can discuss over issues and work for the resolution.After successful completion, now what do you think, can we move ahead and study about most heard concept of Jenkins i.e. “Jenkins pipeline” in the next blog.
Hope This Helps!!
See you soon !!
 FaceBook
 Twitter
 LinkedIn
 Pinterest
 Email
Email
As an experienced DevOps professional, I am having a good understanding of Change and Configuration Management as well. I like to meet new technical challenges and finding effective solutions to meet the needs of the project. I believe in Sharing is Learning.

Cyber Security

QA

Salesforce

Business Analyst

MS SQL Server

Data Science

DevOps

Hadoop

Python

Artificial Intelligence

Machine Learning

Tableau
Search Posts
Related Posts
Receive Latest Materials and Offers on DevOps Course
Interviews


 Feb 12, 2024
 289.3k

 289.3k