
 Apr 28, 2020
  5k
5k

28
JulInternational Womens Day : Flat 30% off on live classes + 2 free self-paced courses - SCHEDULE CALL
- Selenium Blogs -
You have gone through very basic Selenium concepts that are required to create your Selenium Test case. In this article, you will learn how you can integrate these cases with TestNG.
TestNG is an open-source testing Framework tool of java which is developed by Cedric Beust. It is developed on the same lines as NUnit and JUnit. It has become a more powerful and robust framework from other ones due to its advanced and more powerful features. It is very easy to use. The number of test cases you can combine in a single class and can run collectively.
NG in TestNG stands for “Next Generation”. You have seen many developers who are using it for unit testing. Hence it is more beneficial for both developers as well as a tester.
Before writing the test case you will have to perform some steps to configure TestNG in your project.
1. Launch your eclipse workspace.
2. Click on your Project and then Go to the Help Menu bar and select Eclipse Marketplace.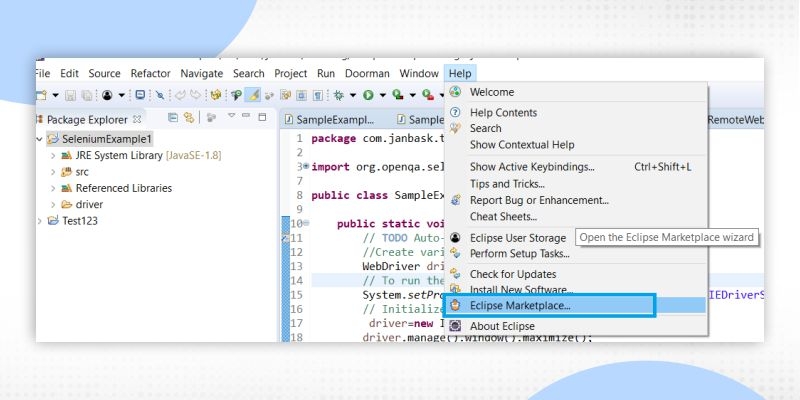
3. Now Search with TestNG under Find Search Box. Click on Install if it is not installed already. After installation is done, the install button will convert to installed.
4. Now close the window and Right click on your Project. Select the Build Path and then configure the Build path.
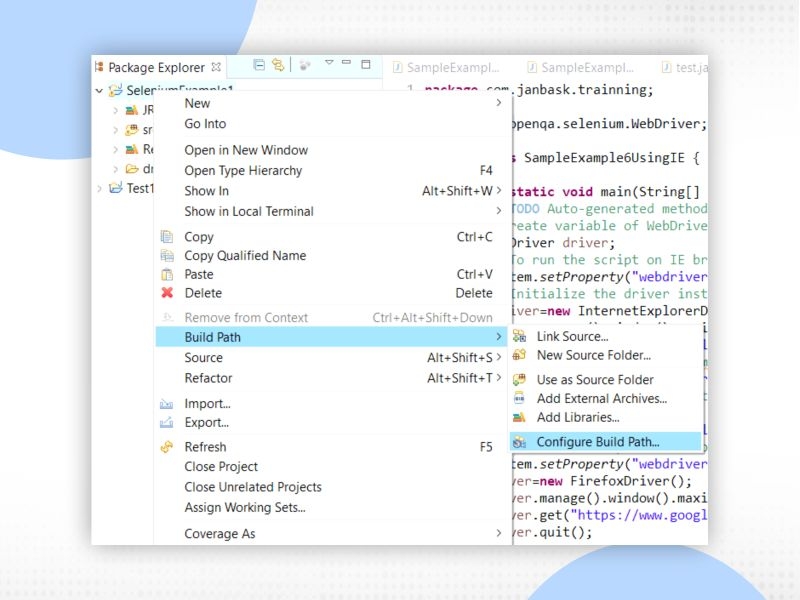
5. Click on Add Library and select TestNG. It will configure TestNG in your Project. Now you can use the TestNG feature.

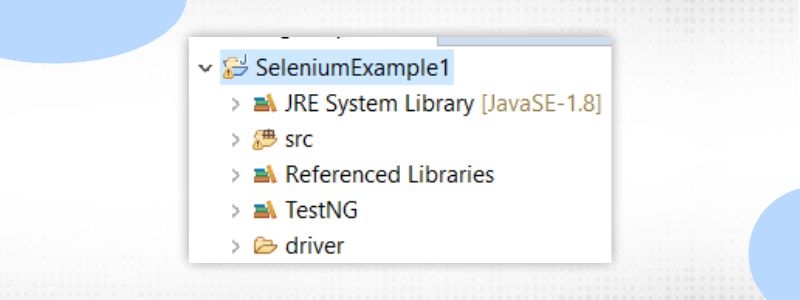
6. Once you add a TestNG library you can see the TestNG library added in your Project.
QA Software Testing Training

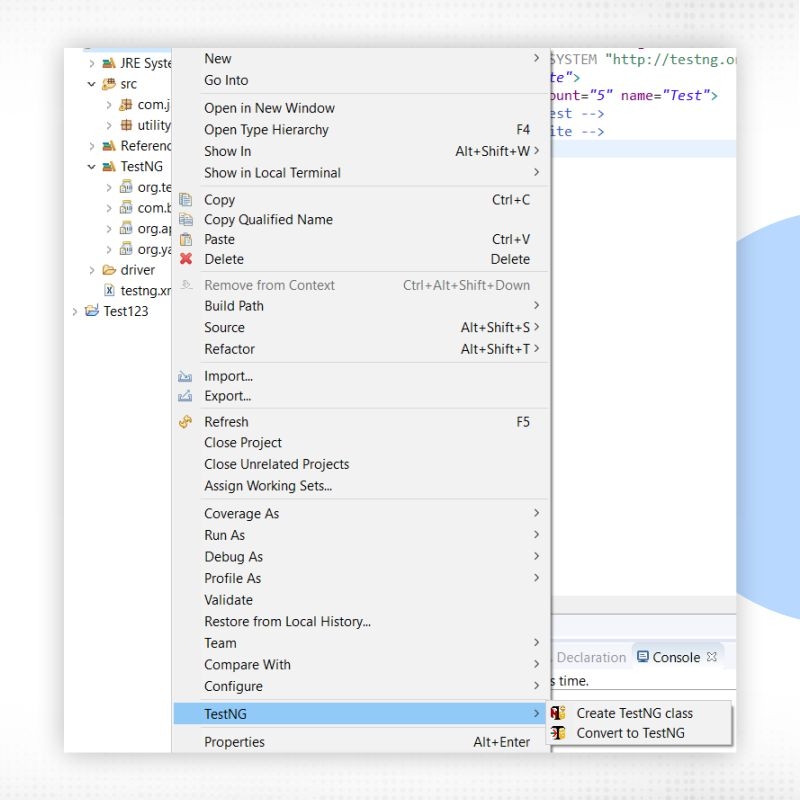
7. To verify it, right click on the project then you will see TestNG option.
In this Test Case, you would be able to see different annotations that can be used with the TestNG class.
1. Right Click on Project and select New. Choose Another option. Select TestNG class

2. Click on Next Button.
3. Enter the Source location and Package name.
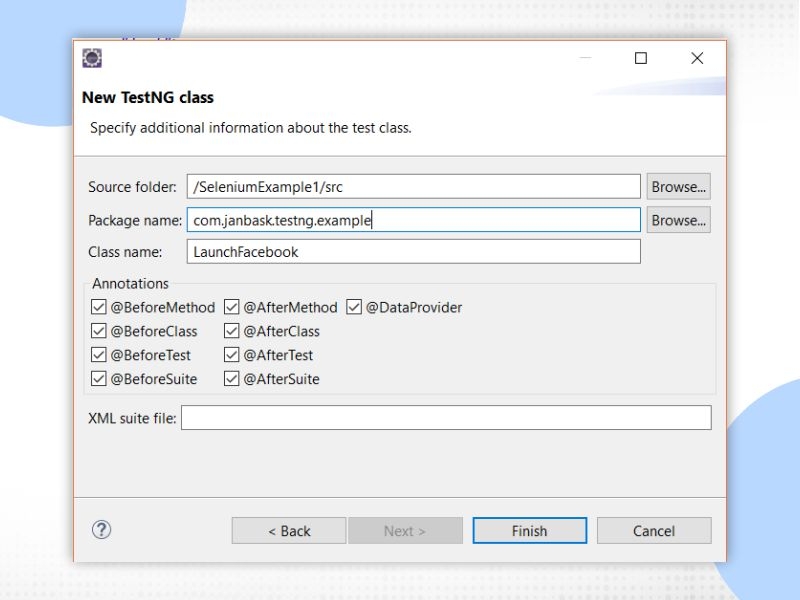
Here you can see the number of Annotations which can be selected as per the requirement of the test case. Each annotation has its importance. I will explain Annotation in a separate article.
3. Now keep 3 annotations which are mostly used in each Framework
@BeforeTest
@AfterTest
@Test
@BeforeTest: To write all initial steps which are common to each script that is Initialization of driver and Opens the URL.
@AfterTest: To close the driver. It is always used to end your script.
@Test: To write the Test Script. Main Test Script come under this annotation like Verify login is successful, click on any event, Display list of elements
QA Software Testing Training

Example: To log in to the Facebook site.
Step 1: This is the common step for all the test cases. Go to the Facebook site.
@BeforeTest method will handle this common test step for all scripts.
Step 2: Enter the valid credentials
@Test annotation method will have the main script so it will pass the credential and click on the login button.
Step 3: Close the browser.
@AfterTest method will close the browser.
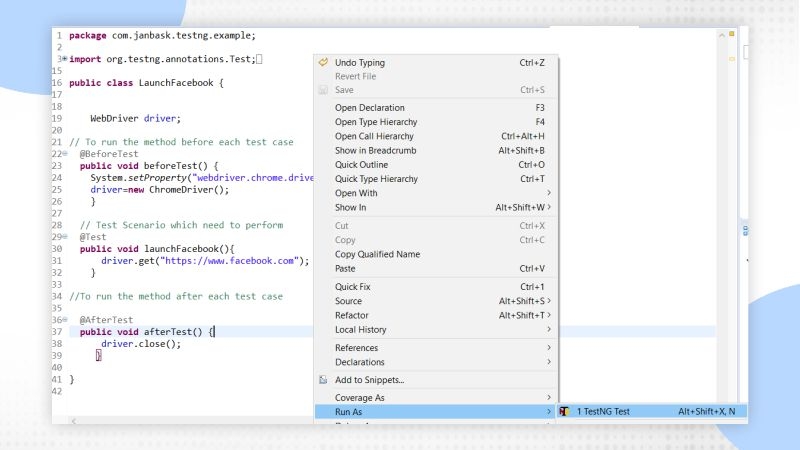
Eclipse code:

How to run the test cases:
To run this test case there are 2 ways:
1.Using by right click on Test case window and run as TestNG Test. When you want to run only one class then this method is mostly used.
2. Right-click on TestNG.xml file and Run as TestNG suite.
This way is mostly used when you are to run multiple test cases in one go. SO TestNG.xml files run all the classes which are listed in this XML file.

You have already gone through the User Defined Methods. But here I will explain to you, How can you integrate the User Defined Methods with TestNG Framework.
QA Software Testing Training

Step 1: Create a method having setup statement under @BeforeTest annotation like
Access URL
Launch Browser
Maximize window
Set the Implicit wait to find elements
@BeforeTest

 public void setUP() {

  System.setProperty("webdriver.chrome.driver", ".\\driver\\chromedriver.exe");

  driver=new ChromeDriver();

  // Navigate to Particular webpage

  String url="https://www.flipkart.com";

  driver.get(url);

  driver.manage().timeouts().implicitlyWait(10,TimeUnit.SECONDS);}

Step 2 : Write all statements which are implementing Test Case under @Test Annotation using User Defined Methods

a)Close the Login Modal

b) Access list of Login menu

@Test
 public void accessLoginButton() {

  CommonUtility.move_to_element(driver); ------ User Defined Methods
  //To get all the option under Login Menu

  CommonUtility.login_list( driver); -----------User Defined Methods
Step 3: Close the browser using @AfterTest Annotation
@AfterTest

  public void tearDownBrowser() {

   driver.close();

     }
Code In Eclipse:

OutPut:
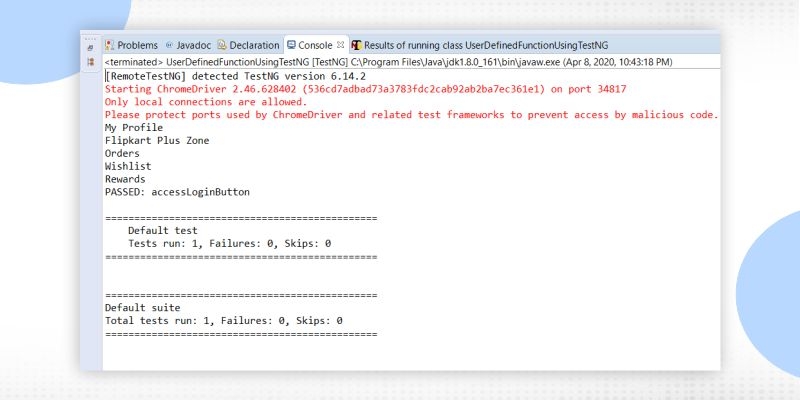
In the TestNG framework, you can see the default report generated after running the report. You need to refresh the project. And then you can see the test-output folder having default report.
Learn QA Software Testing in the Easiest Way


How to access TestNG by default Report :
Right click on index.html file and Open with WebBrowser. TestNG reportsreport in tabular form will get displayed.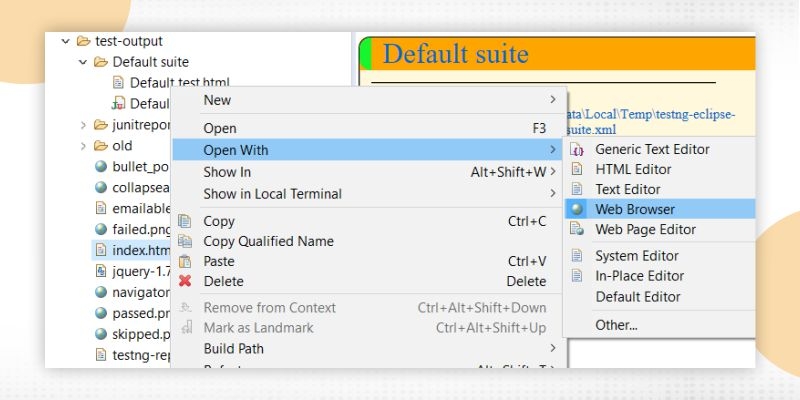
How to write Test case in a single class using different types of synchronization methods.
Example without using TestNG:

In this example, you can see that all the locators, Parameter, Wait all are written in a single method. Suppose if there is a big script then how much it would be difficult to debug it. So in the below example, you will see using User Defined and Synchronization method, how can we make our code readable and easy to understand.
Step 1: Create an enumeration class which is having all the Locators.
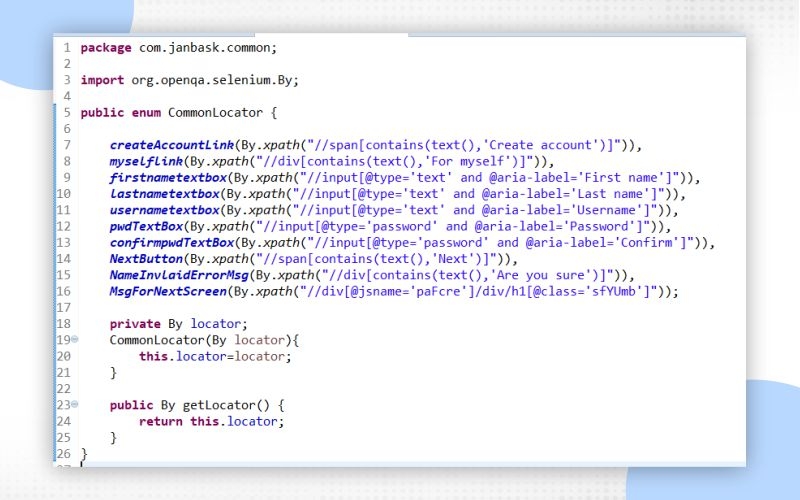
Step 2: Create two methods in Script. One for access to all these Locators and second which can be used to apply Explicit wait on an element.
public void verifyFileds() {


CommonLocator.createAccountLink.getLocator().findElement(driver).click();

CommonLocator.myselflink.getLocator().findElement(driver).click();

wait Till Visibility Of Element(CommonLocator.firstnametextbox.getLocator());

CommonLocator.firstnametextbox.getLocator().findElement(driver).sendKeys("345345nsal11");

CommonLocator.lastnametextbox.getLocator().findElement(driver).sendKeys("cavipinbansal11");

CommonLocator.usernametextbox.getLocator().findElement(driver).sendKeys("cavipinbansal11");

CommonLocator.pwdTextBox.getLocator().findElement(driver).sendKeys("cavipinbansal11@1");

CommonLocator.confirmpwdTextBox.getLocator().findElement(driver).sendKeys("cavipinbansal11@1");

CommonLocator.NextButton.getLocator().findElement(driver).click();

}

public void wait Till Visibility Of Element(By locator) {
WebDriverWait wait=new WebDriverWait(driver,10); wait.until(ExpectedConditions.visibilityOfElementLocated(locator)); }
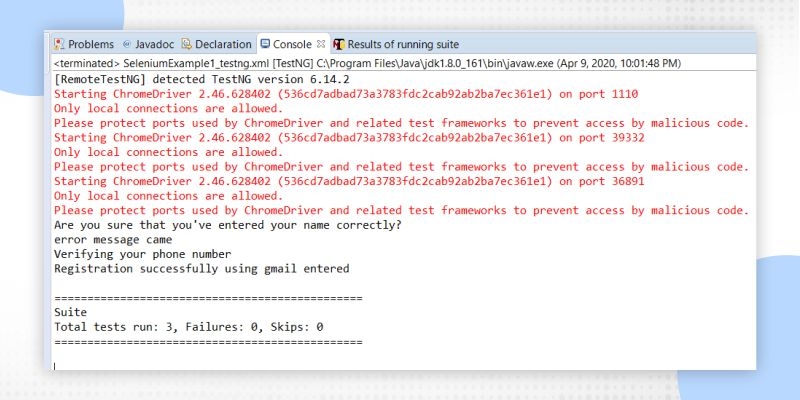
Step 3: Now call this method in the script under @Test method
@Test
public void verifyEmailRegistartion() {

verifyFileds();

String Expected_Error="Are you sure that you've entered your name correctly?";

String Actual_Error= CommonLocator.NameInvlaidErrorMsg.getLocator().findElement(driver).getText();

System.out.println(Actual_Error);

if(Actual_Error.contentEquals(Expected_Error)) {

System.out.println("error message came");
CommonLocator.firstnametextbox.getLocator().findElement(driver).clear();

CommonLocator.firstnametextbox.getLocator().findElement(driver).sendKeys("Divyanshi");

CommonLocator.lastnametextbox.getLocator().findElement(driver).clear();

CommonLocator.lastnametextbox.getLocator().findElement(driver).sendKeys("Bansal");

CommonLocator.NextButton.getLocator().findElement(driver).click();

}

waitTillVisibilityOfElement(CommonLocator.MsgForNextScreen.getLocator());

String next_screen=CommonLocator.MsgForNextScreen.getLocator().findElement(driver).getText();

System.out.println(next_screen);

if(next_screen.contains("Verifying your phone number")) {

System.out.println("Registration successfully using gmail entered"); }

else {

System.out.println("Please eneter correct email id or password");}}
Step 4 . Run your script as TestNG test
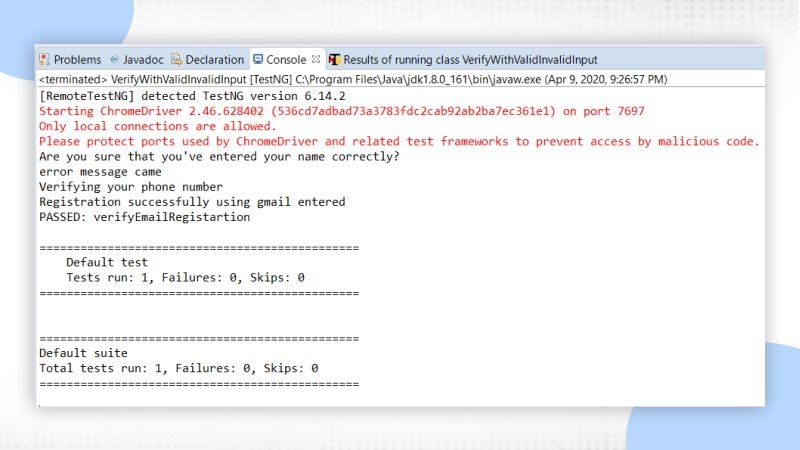
Code in Eclipse :

Output :
Scenario: If we have multiple Test cases in different classes then using TextNG XML file they can be run in a single click. In the TestNG XML file, you need to add all the class's name which you want to run.
You have seen that How we run each test case separately. Now in this example, you will see how you can run all these using a single .xml file.
Here we have 3 classes created using TestNG.

USing TestNG.xml file we can run all these 3 test cases in one go
OutPut :

OutPut of the code :
It is a very important feature of TestNG. This feature does not exist in Junit. As the name suggests, you can make different groups of your test suites by doing partitioning.
In Testing Framework there are thousands of test cases written and Sometimes it is not necessary to run the complete test suite. The only requirement is to run some test cases. In that situation, you can make a separate test suite name given as Sanity suite or Smoke suite which contains very limited test cases and covers all the important functionality of your application.
Groups are specified in your testng.xml file using the
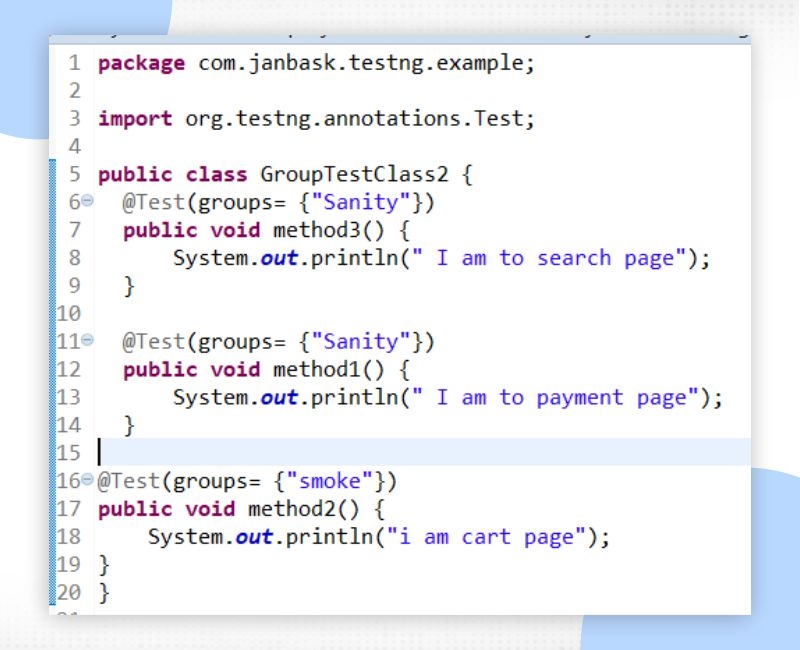
Lets us understand Grouping of Test Case using an example :
Class 2:
Here in 2 classes you can see some test cases are related to Smoke Group and some are related to Sanity
Now using TestNG.xml file How to run these test cases:
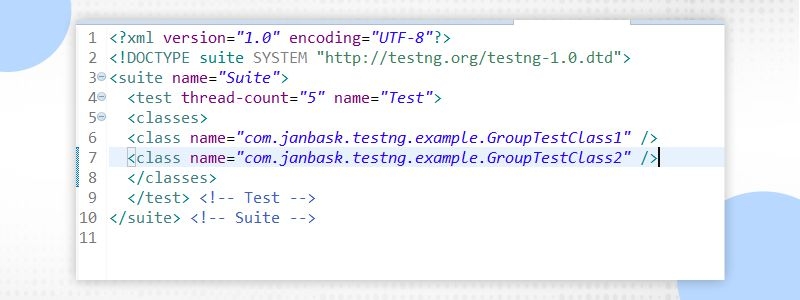
As you can see that we didn't include any Group in the XML files and that's why it will run all the test methods.
Output :
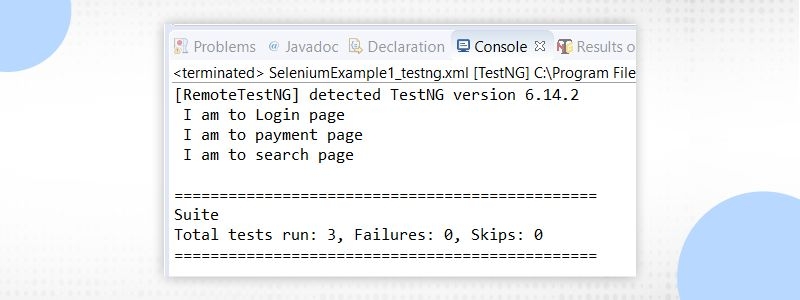
Test Method which belongs to Sanity Group will run this time
Test case belongs to Multiple Groups:
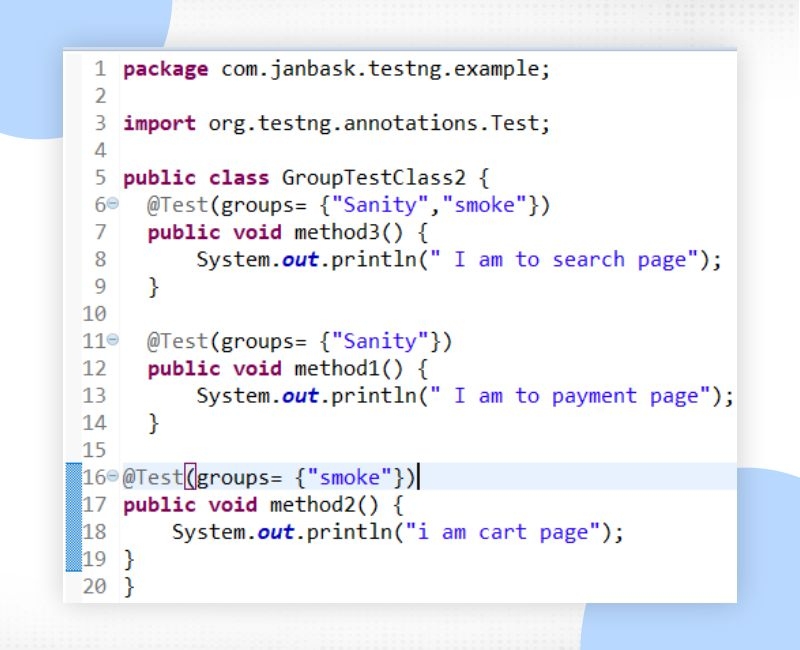
So If testNG.xml file includes group name either Sanity or smoke in both cases method 3 will be run.
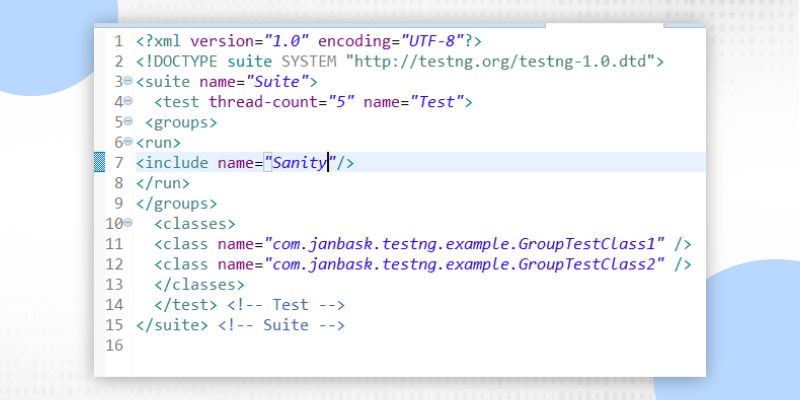
Exclude and Include Group Name :
In TestNG.xml file provide include and exclude tag by using you can Exclude and include any test method belonging to a respective group name.

The main advantage of exclude group tag is that when there are many different groups are created and you are to exclude only one group and rest you want to run all the test cases. In that case, you just need to use the exclude tag with the group name.
TestNG Framework provides the feature so that you can run the test case parallelly. There are some situations where you need to execute the test case parallelly. So in TestNG.xml files, you need to add one attribute in the 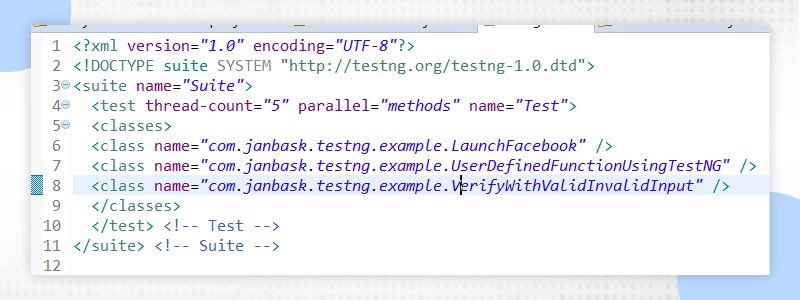
TestNG is a testing framework. It provides a testng.xml file which can be modified as per the requirement. You can Group your test case and run them. You can run the test case parallel. It generates the default report which can be mailed to verify. So I have given a very basic idea How to use the TestNG framework and run the test case using TestNG. Now do more practice on that.
 FaceBook
 Twitter
 LinkedIn
 Pinterest
 Email
Email
The JanBask Training Team includes certified professionals and expert writers dedicated to helping learners navigate their career journeys in QA, Cybersecurity, Salesforce, and more. Each article is carefully researched and reviewed to ensure quality and relevance.


Cyber Security

QA

Salesforce

Business Analyst

MS SQL Server

Data Science

DevOps

Hadoop

Python

Artificial Intelligence

Machine Learning

Tableau
Search Posts
Related Posts
Receive Latest Materials and Offers on Selenium Course
Interviews


 Apr 09, 2024
 682.4k

 682.4k