Introduction
The global public cloud share accounts for 32%, and AWS offers scalable and affordable infrastructure in more than 190 countries. Amazon EC2 is one of AWS's most potential and largely utilized services. Amazon provides a wide range of services, but it must be mentioned that AWS EC2 is the main computing component in the pyramid of technology. EC2 makes the regular work of the developers smoother by offering safe and resizable computing capacity in the cloud.
Amazon EC2 is an elastic computing cloud providing scalable computing capacity in the AWS cloud. With AWS EC2 instance types, you can eliminate the need for investing in hardware upfront, and this is easy to develop or deploy apps faster. Also, you can launch as many instances as possible.
Amazon EC2 provides the widest computing platform with more than 600 instances to choose from, according to the workload. Therefore, today we have brought this a complete guide that can help you find all the necessary information about Amazon Web Service (AWS) EC2 Instance type.

What is an Amazon EC2 instance?
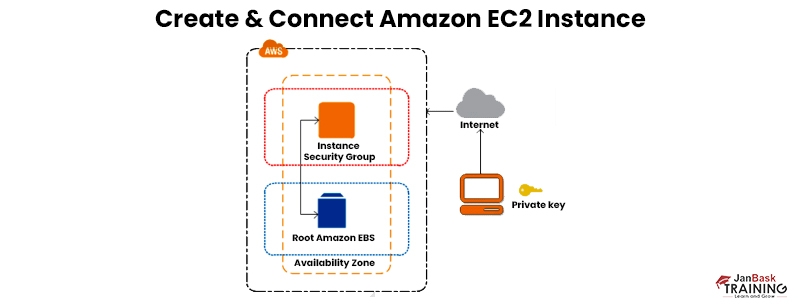
Amazon EC2 instance refers to a virtual server in Amazon’s Elastic compute cloud (EC2) that allows for the running of applications on the AWS infrastructure. AWS is a thorough and developing cloud computing platform. EC2 allows business enterprises to run applications in the computing platform and serve as an unlimited set of virtual machines.
Amazon offers multiple instances with various CPU and memory configurations to meet the user's demand. Every AWS EC2 type instance is of different sizes to adjust to certain workload demands.
Instances are made from Amazon Machine Images, similar to templates configured with an OS to identify the operating platform of the user. Users can choose an AMI offered by AWS or even make their own AMI and utilize them.
Importance of AWS EC2
- Provides Reliability: Amazon EC2 provides 99.9% availability for every Amazon EC2 area, and the services are trustworthy as far as the substitution of instances is concerned.
- Assures security: Amazon functions with the Amazon VPC to offer safe networking and security for the compute resources. The computer instances are in the VPC ( Virtual Private Cloud) in a particular IP range. This function lets the user know which instances are revealed to the internet and which are private.
- Enhances flexibility: Amazon EC2 allows users to choose from various types of instances, software packages, and operating systems, thereby enhancing flexibility. It also allows users to build memory and CPU, which is again optimized for the application,
- Allows cost savings: Amazon EC2 is affordable because it lets the user choose the plan according to the requirement, thereby providing Cost-Saving pricing. The user can save costs and deploy the resources entirely.
- Provides complete computing solution: Amazon EC2 works smoothly with Amazon RDS, S3, and DynamoDB, providing a complete computing solution. This allows the processing and storage solution as well.
- Provides Elastic web computing: This allows the companies to adjust the capacity within a concise time span and commission multiple server instances.
- Provides complete controlled setup: Amazon EC2 provides total control over the EC2 instances, and the users can avail of them and communicate with them.
AWS Solution Architect Training and Certification
- Personalized Free Consultation
- Access to Our Learning Management System
- Access to Our Course Curriculum
- Be a Part of Our Free Demo Class
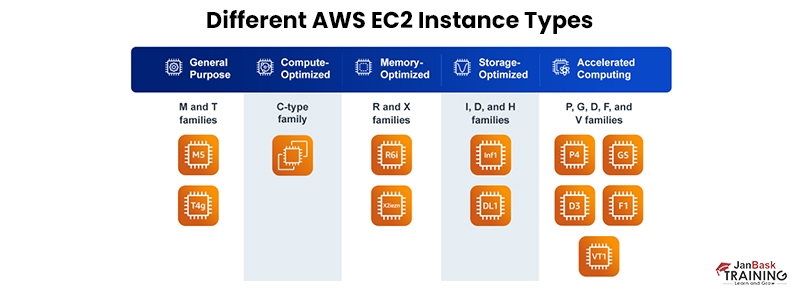
Amazon EC2 Instance Types
When you know how to launch an EC2 instance, this is the time to specify the instance type that can be used for the host computer. Each instance type offers different computing capabilities, memory, and storage, and they are grouped together based on instance families ahead.
Your role here is to decide on the type of instance based on the application requirements you plan to run on your instance. Each EC2 Instance had a consistent and predictable CPU capacity regardless of its underlying hardware.
Using EC2, a few resources of the host computer can be dedicated to the particular instance, like CPU, instance storage, memory, etc. It could also share other resources of the host computer, like network and disk subsystems, among multiple instances.
If any particular instance is overused or underused, loads are shared among instances accordingly. Each instance type offers higher or lower minimum performance from shared resources.
The various types of Amazon EC2 instances are as follows:
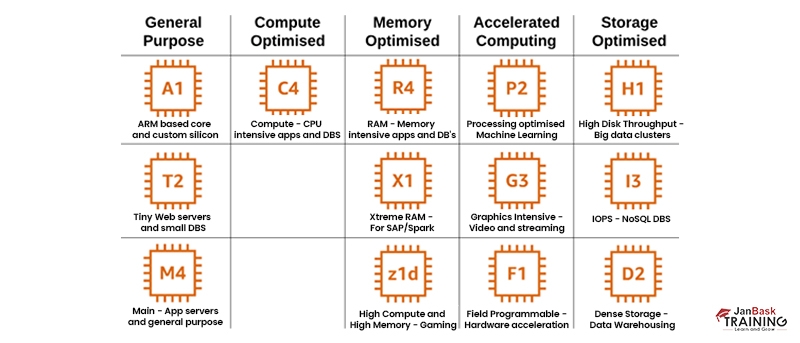
- General purpose: (M and T family)- A proper combination of compute, memory, and networking resources is served by these instances and can be utilized for handling numerous workloads. These instances are perfect for web servers and code repositories which deploy these resources in equal ratios.
These are the most popular instances because various business groups prefer them. They belong to the M and T families consisting of two types of instances:
- Fixed performance (M4 and M3 family) -M4-type instances are the latest generation of general-purpose instances. These provide a proper balance of computing and network resources and serve as a great option for systems with high necessity for microservices.
- Burstable performance (T2 family) - These instances are perfect for running applications such as web servers, code repositories, and test environments. Arm-based AWS graviton3 processors power Amazon EC2 M7g instances, and they offer the most suitable price performances in Amazon EC2 for general-purpose network resources.
- Compute optimized: C type family- These instances are suitable for applications that gain profit from high-performance processors. They are appropriate for batch processing workloads, media transcoding, scientific modeling, performance-oriented web servers, and machine learning inference.
These AWS EC2 instance types are utilized in those systems which demand a high CPU load with properly balanced memory utilization. These instance types are a mixture of CPU, memory storage, and networking capacity that helps you select the most suitable resources ideal for the system.
- Memory-optimized: R and X families- These instances offer quick performance for the workloads requiring huge data sets to be prepared within the memory.
These instances can be employed in the following two situations: Relational (MySQL) and NoSQL (MongoDB, Cassandra) databases with high performance. These instances are also perfect for automation applications in electronic gadgets, in-memory caches, and analysis of huge data.
- Accelerated computing: P, G, D, F, and V families- These instances utilize hardware accelerators which are also termed co-processors, to execute functions like floating point number calculations and graphics processing.
These instance types are ideal for Graphics Processing Units and graphics-intensive applications such as game streaming and rendering.
- Storage optimized: I, D, and H families- Few workloads require high speed and involve consecutive read and write access to huge data sets on local storage. These instances are suitable for such workloads to serve applications with random I/O operations every second.
These instance types are demonstrated by the I2 and D2 INSTANCE FAMILIES. I2 instances comprise huge SSDs for random I/Os needed by databases and data warehouses. These instances are suitable for NoSQL databases like Cassandra and OLTP. These instances are required for caching, indexing, streaming, and online transaction processing in high-frequency systems.
How to choose the right Amazon EC2 instance type?
A vast number of Amazon EC2 instances can be utilized in AWS. In a single family of instances, there are 18 different configurations. So, it gets difficult to comprehend the right instance type for a particular workload. If you have a compute-intensive application that makes many floating-point calculations, an accelerated instance is a suitable option.
Various technical limitations and the local storage limits on different instances should also be considered while choosing the best instance type for a workload. Along with this, business protocols should also be considered, which can influence the choice among the instances. IaaS clouds lower infrastructure costs and raises the potential of a company to adhere to the alterations in business situations. The huge choice among instance types can be confusing and worsen the performance.
Hence, a proper and detailed insight into the variations of the instances along with the features of the workload is necessary, including short-term bursts in CPU load.
Why you should consider changing the instance types
Sometimes you might feel that the instance is overused or underused depending upon your need. In that case, you can alter the size of the instance. Let’s take an example, if the t2.small instance is very small for the particular workload, you can alter it to an instance type that goes perfectly with the workload. You also have the option to migrate from an existing instance to a new one to get the privilege of some new characteristics of the instance.
How to change the different instance settings?
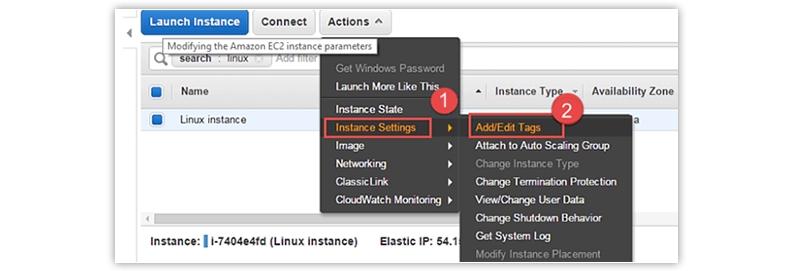
There are different instance settings, like security groups, tags, termination protection, etc., that you need to work on when modifying an instance other than resizing it. Let us discuss on most important instance settings that should be learned or practiced thoroughly.
Create or Edit Tags
You can always add or edit tags assigned to an instance when necessary. Tags will make tracking instances easy, especially when there are multiple environments. Let us know how to edit tags in the AWS EC2 Instance.
- Click on Instance Settings and choose the “add/edit tags” option.
- A tag is a key-value pair, so give values for both parameters and click on the Save option.
- Now go back to the EC2 Instance Dashboard and select your instance again. Here, changes will be reflected clearly made recently.
Attach to an auto-scaling group
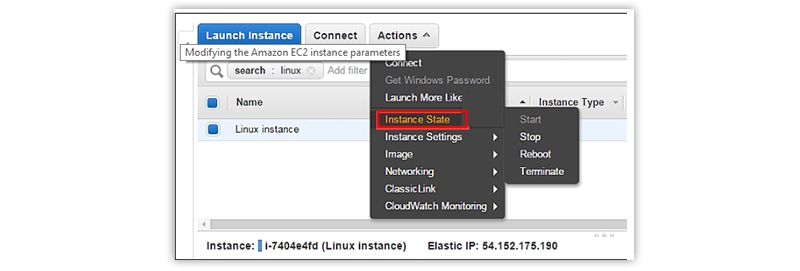
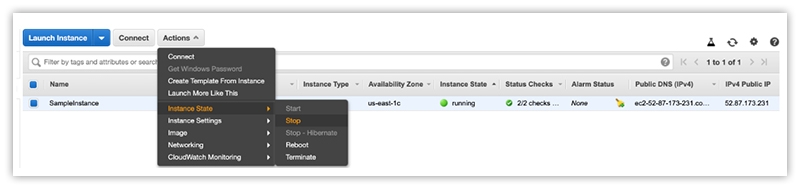
Change the Instance State
You can change the state of an instance from the AWS management console with a single click only. Three popular states of an instance can be defined as given below.
- Stop – Here, you can stop the running state.
- Reboot – This is used to reboot an instance
- Terminate – This state is used to terminate an instance permanently.
For this purpose, go to the Instance State option on the EC2 Dashboard from the navigation pane and click on the desired state, like Stop, Reboot, or Terminate.
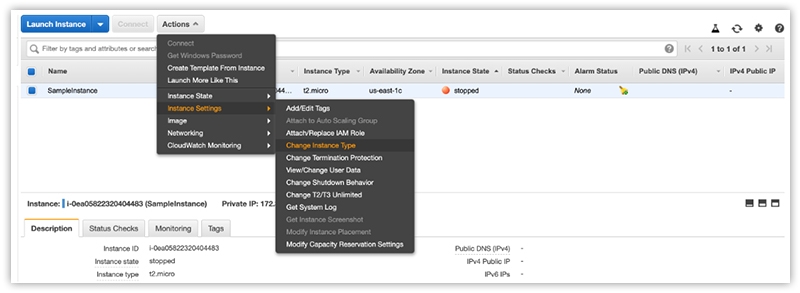
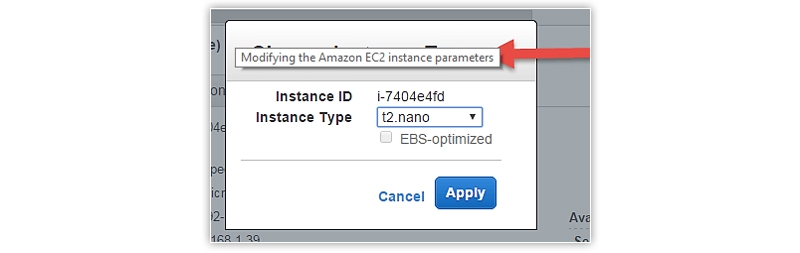
Change the Instance Type
- To change the instance type, go to the Instance Settings option and click on the Change Instance type option.
- An Instance type popup box will appear in front of you.
- Here, you can select a particular instance type from an available range of instance types. Remember that each instance type has a specific meaning, so you should know its meaning and why you need it.
- Once you have selected the desired instance type, click on the Apply button in blue.
- Now you may check the description of the instance where its type has been changed automatically and reflected by other users.
- There will be changes in other configuration settings, and existing installations on the server will remain intact.
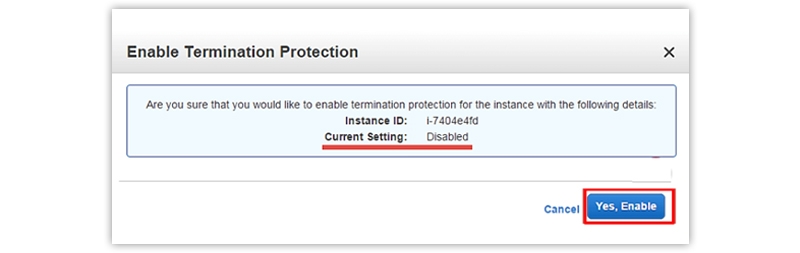
Enabling Termination Protection
It will add an additional level of security if you click the terminate option by mistake. This step will make sure that no instance is terminated accidentally but intentionally.
-
Go to the Instance Settings first and choose the “Change termination protection” option here.
-
If the current setting of your Instance is disabled, then click on Yes to Enable.
-
Now Select the instance state, and click on the Terminate option. AWS will immediately notify here that instance is termination protection enabled and will not delete it accidentally.
Change the User Data
To change the user data, go to the Instance Settings first and choose the view/change user data option.
Now modify or edit the user data fields and click on the Save option at the end.
Change the shutdown Behavior
- To change the shutdown behavior, go to the Instance Settings first and choose the change shutdown behavior option.
- Now choose the shutdown behavior and click the Apply button at the end. Now shutdown behavior will change accordingly.
View System Log
- You can see the system log for any EC2 Instance for troubleshooting purposes. For this purpose, go to the Instance Settings first and choose the “get system log” option.
- A separate window will appear in front of you where you can view the system log. You can also check when instances were restarted or stopped.
Create an Instance AMI
- To create an AMI of EC2 Instance backup, Go to Image and click on create image option. One image wizard will open in front of you.
- Here, you have to add all necessary details related to the image, like Image Name, Image Description, etc, and hit the Create Image option at the end.
- AWS will receive the request and respond to you back immediately.
Change the Security Group Settings
- To change the security group, for instance, Go to Networking and choose the “Change Security Groups” option.
- The security group wizard will give you the list of all available security groups for existing instances.
- Tick the box against the desired security group and click the Assign security groups button at the end.
- From the EC2 dashboard, you may check that the security group, for instance has been changed.
Add/Create a Network Interface
.
- For this purpose, Go to Networking and choose the “Attach network interface” option
- It will show an error if the network interface is not created already. So, create the network interface first, then attach it to the EC2 Instance.
- To create a network interface, go to the EC2 dashboard and choose on Network Interface option in the left pane.
- Here, you need to give complete details for the network interface, like description, subnet, security groups, etc. Click on the “Yes, Create” option at the end, and your network interface will be created successfully.
Dissociating Elastic IP address
- An elastic IP address is a static public IP that can be dissociated directly from the EC2 dashboard. Let us see how to do it.
- Go to Networking, and choose the “Dissociate Elastic IP address” option.
- One popup box will appear where you can click on the “Yes, Dissociate” button to make the EIP field black, for instance.
Manage Private IP addresses
- You can assign multiple private IP addresses to an instance based on your application architecture. The maximum number of IP addresses that can be assigned depends on the EC2 Instance type.
- To assign multiple IP addresses, click Networking and choose the “Manage IP private addresses” option.
- Now, you can auto-assign any available IP address and click the Update button.
- Go to the EC2 Dashboard and check either Private IP addresses are assigned successfully or not.
The process may sound tough at first glance. You can always learn the process like a pro with little practice and effort. Still, if you encounter any problems, join our AWS training and certification course and master everything from scratch.
AWS Solution Architect Training and Certification
- No cost for a Demo Class
- Industry Expert as your Trainer
- Available as per your schedule
- Customer Support Available
Other Ways of Changing AWS EC2 Instance Type
You can also change the AWS EC2 instance type from AWS CLI or Management Console.
How to change the AWS EC2 instance type from the AWS console?
First, log in to the AWS management console and select the EC2 instance you want to change from the EC2 dashboard.
Step 1: Stop the instance
After you have planned which instance you want to choose, select that by selecting the checkbox and stop it by clicking on Actions -> Instance State -> Stop.
Step 2: Change the instance type
After stopping the instance as per your choice, choose the same instance and select Actions -> Instance settings -> Change instance type.
Step 3: Select the new instance type
Now you will notice a small modal box with a dropdown menu where you can select the new instance type as per your convenience.
Step 4 : Verify the changes you have made after selecting the new instance
The change in the instance will be shown instantly in the console on the description tab after you have made the change in the AWS EC2 instance type.
Consideration To Focus On When Resizing An Instance Type
As per your needs, you may find your instance either over-utilized or under-utilized. If this is the case, you should change the size of the instance based on requirements.
For example, if your instance is too small as per the workload, you should change it to another instance type appropriate for the workload. In a few cases, you may be interested in migrating from older instances to new-generation instance types to take advantage of some extra features and support for IPV6.
If the root device for your instance is an EBS volume, then you can resize instances by simply changing their instance type. The process is known as the resizing instance type here. If the root device for the instance is an instance store volume, you can migrate your application to a completely new instance by defining the type you need.
When you are resizing an instance, you should select an instance type first that is compatible with the configuration of the instance. If there is some compatibility issue, then you should migrate the application to a new instance with a particular instance type as required.
Every time you are resizing an instance, the resized instance has the same number of instance store volumes as specified when the original instance was launched. To add more instance store volumes, you should migrate the application to a new instance by specifying the instance type and instance store volumes. One exception to the rule when resizing to storage-optimized instance types is that by default, it contains a higher number of volumes, and you can use them based on requirements.
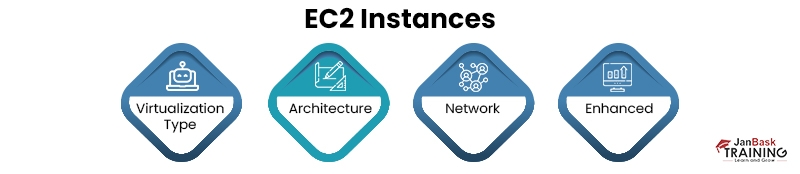
How To Check The Compatibility of EC2 Instances?
You can change the size of an instance only if it is compatible in the following ways:
- Virtualization Type: Linux AMIs use one of two types of virtualizations: PV (paravirtual) or HVM (Hardware Virtual Machine). You cannot resize an instance launched from PV AMI to an instance that is HVM only.
- Architecture: AMIs are always specific to the processor architecture, so you should always select an instance type with the same processor architecture as the current instance type.
- Network: Fresh instances should be launched within a VPC. You cannot resize an EC2 classic instance to an instance available only in a VPC unless you have a nondefault VPC. For this conversion, you first migrate the Linux instance from an EC2 classic platform to a Linux instance in a VPC.
- Enhanced Networking: To support the enhanced networking within instance types, you need the necessary drivers installed on your system.
Steps for resizing an AWS EC2 Instance
This is vital stopping an instance before you change its instance type. When starting or stopping an instance, you need to focus on the following steps:
- When we are shifting an instance to a new hardware, its ID would remain the same.
- If your instance has a public IPV4 address, then release the old address and give it a new public address. It will retain its private address, any Elastic IP address if available, or IPV6 addresses too.
- If an instance has an auto-scaling group, then it will mark the stopped instance as unhealthy, and it may be terminated, and you need to launch a replacement instance here. To avoid this, you should suspend the scaling process for the group when resizing an instance.
- Make sure that you are ready for downtime when the instance is stopped. Stopping or resizing an instance always takes time, and restarting an instance will take a viable amount of time based on the startup scripts of an application.
Once you are sure of all considerations to keep in mind when changing the instance settings, this is time to take real action using the AWS Management Console.
- This step is optional but may be required in a few cases. If any new instance requires drivers that are not installed for the existing instance, then connect to your instance first and install the necessary drivers first.
- Now open the Amazon EC2 Console and start your work.
- In the navigation pane, choose the option Instances and select the Instance.
- Further, you can choose actions, state for an instance, or choose to stop an instance.
- In the confirmation dialog box, choose yes, Stop. It will take some time for any instance to stop.
- With the particular instance selected, choose actions, select instance settings, and then choose “change instance type.” Remember that you will not be able to see this option if the instance is not stopped yet.
- In the dialog box for change instance type, perform the following steps ahead.
- Choose the instance type first that you need. If the instance type does not appear in the list, then it is not compatible with the configuration of your instance. Reasons could be any, as discussed earlier in the compatibility section, like virtualization type, networking, etc.
- In the end, choose to Apply to accept the new settings.
- Once changes are made successfully to the selected instance, this is the time to restart the stopped instance. For this purpose, select the instance first, then choose actions, select the instance state then choose the Start option.
- From the confirmation dialog box, choose the option Yes, Start. It will take some time for any instance to enter the running state. So, you have to be a little patient in that case.
- If your instance was not booted successfully then it could be possible one of the requirements for the new instance was not met. So, you have to be extra mindful and cautious while changing the state or type of an instance.
Steps for Migrating an AWS EC2 Instance
When you want to move a particular instance to any other instance type, you must migrate it by creating an image of your instance and launch a new instance by defining its state or type properly. To keep the hosting uninterrupted, take the elastic IP address associated with the original instance and associate the same with the new instance. Once it is copied, you can terminate the original ones.
Here are a few steps to follow while migrating an AWS EC2 Instance:
- Take the backup of instance store volumes first that are needed for the persistent storage. Now detach the data from the original ones to be associated with the new instance.
- Now create an AMI, and there are certain prerequisites for the same that you need to follow. Once you are done with AMI creation move to step 3.
- Now open the Amazon EC2 Console. From the navigation pane, select AMIs owned by you and select the image that was created in the first step. You can cross-check the AMI with its name that was given during its creation. In case you didn’t find the AMI you created in step 2, then select the region again where it was saved.
- Choose the Launch option moving ahead and decide on the instance type wisely. Remember that you are terminating the original instance only, not the new ones. To avoid any confusion, you may check the launch time too. For this purpose, choose actions, select instance state, and choose to terminate.Initiate the instance
After you have verified the change in instance type as per your choice you can proceed and start the server.
How to change AWS EC2 instance types from AWS CLI?
At first, AWS CLI needs to be installed and configured by the following process:
- Download AWS CLI
- Create API key from IAM on the management console
- Enter the AWS secret key and access key id to the aws configure data.
Now, follow the below-mentioned steps to change the AWS EC2 instance type:
Step 1: Decide on the instance ID of your preferred instance.
For this, you just need to log in to the AWS management console, or AWS CLI commands can also be utilized to see the various instances.
Step 2: Stop the instance
The following AWS CLI command can be used to stop the instance
Step 3: Check whether the instance has stopped.
Step 4: Change the AWS EC2 instance type with AWS CLI command
The following AWS CLI command will change the aws ec2 instance type from t2.medium to t2.small
Step 5: Check if the instance type has changed
You can use the same command utilized in step 3 to check if the aws ec2 instance type is changed as per your choice.
Step 6: Initiate the instance
You can use the following command to start the instance.
Conclusion
Amazon EC2 decreases the time needed to get and boot new server instances and lets the user scale capacity at a faster rate as per the alterations in the computing requirements. Amazon EC2 also saves the financial resources of computing by letting you pay only for the capacity utilized. Amazon EC2 allows for ascendable computing capacity in the AWS cloud. Companies use AWS cloud engineers to create and utilize applications rapidly without the need to invest in hardware resources. If you wish to become a cloud engineer, read our blog about required essential skills for aspiring cloud engineers, to learn and grow in this trending field.
AWS Course
Upcoming Batches
Trending Courses
Gen AI
- Introduction to Generative Models
- Generative Adversarial Networks (GANs)
- The Art and Science of Prompt Engineering
- MLOps: Deploying Generative AI Models
Upcoming Class
2 days 30 Jun 2026
Agentic AI
- Introduction to Agentic AI
- Multi-Agent Setup with LangGraph Context Handling in Graphs
- Performance Benchmarking Advanced Prompt Engineering for Agents
- Agent Behavior Tuning Project and Mock Session
Upcoming Class
12 days 10 Jul 2026
AI in Automation Testing
- Intro to AI & ML in Automation
- Playwright + JS (JavaScript) + API Tesng
- Automaon with Using ChatGPT & Playwright MCP server
- GitHub Copilot, AI Tools & Interview preparation
Upcoming Class
5 days 03 Jul 2026
Cyber Security
- Introduction to cybersecurity
- Cryptography and Secure Communication
- Cloud Computing Architectural Framework
- Security Architectures and Models
Upcoming Class
5 days 03 Jul 2026
Data Science
- Data Science Introduction
- Hadoop and Spark Overview
- Python & Intro to R Programming
- Machine Learning
Upcoming Class
6 days 04 Jul 2026
QA
- Introduction and Software Testing
- Software Test Life Cycle
- Automation Testing and API Testing
- Selenium framework development using Testing
Upcoming Class
4 days 02 Jul 2026
Salesforce Service Cloud
- Industry Knowledge Introduction
- Adoption and Maintenance
- Interaction Channels Introduction
- Integration and Data Management
Upcoming Class
5 days 03 Jul 2026
AWS
- AWS & Fundamentals of Linux
- Amazon Simple Storage Service
- Elastic Compute Cloud
- Databases Overview & Amazon Route 53
Upcoming Class
4 days 02 Jul 2026

 May 03, 2023
  928.8k


 Initiate the instance
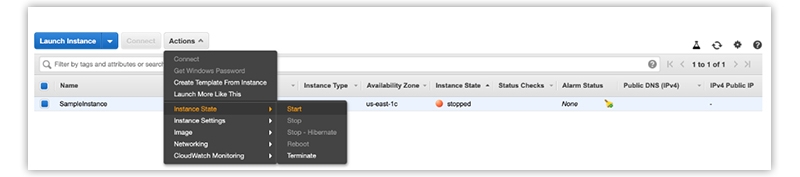


 Sep 04, 2019
 8.4k
8.4k